Sorry if you thought you had missed Christmas!
Ok ladies and gents !
Today it is a bit of DIY. Specifically a transport box for your prized
possessions. Recently my pieces have been becoming more and more complex, with
weird bits sticking out all over the place. For this reason I can no longer
reliably use transport cases such as Citadels or others similar. I needed a
transport system where NOTHING touches the models inside. SO after having
skimmed the web and picked up a few ideas I planned out my own box.
Here, in a photo step-by-step, the method in which I went about it and a few things I would change if I had to redo it.
First a few useful things to remember:
- measure twice: cut once
- don't hit your thumb unless you derive some weird satisfaction from inflicting bodily harm to yourself (and if you do I have nothing to do with that right? :p )
- sawdust and other workshop dust can be nasty stuff so please wear appropriate protection
 |
| I had the various pannels cut to measure at my local DIY store. This makes life so much easier and with their gear they will (theoretically) always get the angles right. |
 |
| When building up the box it is much easier to hammer your nails into one of the pannels about half way. This way you will not feel as though you need a third hand when holding two bits of wood, a nail, a hammer, and praying you won't hit your thumb... |
 |
| Along the edge that has not been prepared with nails lay down a line of PVA glue. Not only will this make the construction a bit tougher, but it will also make the joint slightly watertight. |
 |
| First two boards assembled! Now for all the rest... One board is slightly longer than the other so as to support the front of the box at the end of the construction. |
 |
| And the third... You get the picture right? Same for the fourth... |
 |
| It is now time to fix the back of the box. Exactly in the same way as the sides were assembled: pre-nail the pannel that will be the back, and put PVA glue around the the other boards at the point of contact. |
 |
| the main body is now finished. |
 |
| I trace the centre line across the top of the box to fit the handle dead centre |
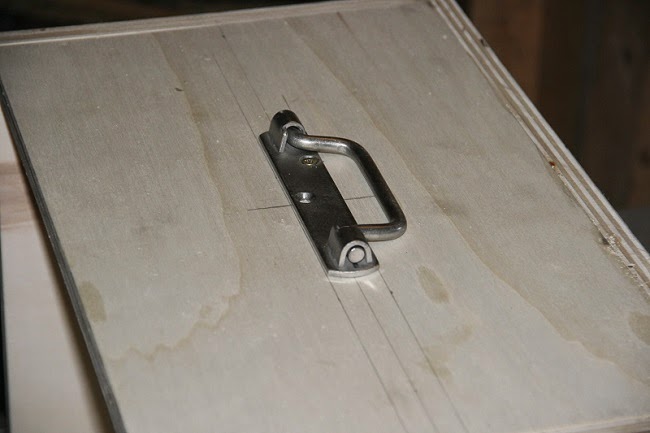 |
| I picked up a basic handle from the DIY store for this. Simply screw it into th wood. If you are really paranoid you can drill through the top of the box and actually bolt the handle to the top. |
 |
| Time to screw the closing clasps. Remember to always tighten both screws progressively together (so go back and forth between screws until properly tightened) |
 |
| Check once again that all is properly aligned... then screw the second part of the clasp on. I put the flat part on the actual "door" of the box to be able to store it flat. |
 |
| The box itself is finished. In the little red circles you will see that if I had thought a bit better I would have left two little bits of the "door" so as to better lock into place. But it still works so hey! :) |
 |
| next trace out a grid of 2x2cm squares on a new piece of wood that corresponds exactly to the inside dimensions of your box. Then drill out alternate holes (like the orange circles ;) ), I recommend using an 8mm drill bit. |
 |
| Because I'm needing two shelves and I don't want to waste time drawing two grids: I clamp both boards together and drill through them both at the same time. |
 |
| The finished boards. |
 |
| carefully round of the edges of the shelf supports.This will make it easier to slide the shelf into the box. |
 |
| all the shelf supports ready |
 |
| once again: some PVA glue for extra resistance. |
 |
| first fix all the LOWER supports, on both sides of the box (note that the length of the supports is a couple of centimetres shorter than the depth of the box) |
 |
| Then place the shelf on its supports and fix the second set of supports. IMPORTANT: as soon as you have fixed the supports -> remove the shelf just in case a small speck of glue is touching said shelf and therefore making it impossible to pull out later. |
 |
As a finishing touch: fix some form of small shock absorber to the underside of your box. These can be found in any DIY shop, usually near the kitchen furniture random stuff.
And there you have it. Not too hard really :)
I hope this helps any of you setting out to build your own box :)
A few pictures of the finished product: |
 |
| Now to paint it... :D |
Happy DIY people and have a lovely week end!


