Showing posts with label Work In Progress. Show all posts

Saturday, 9 May 2015

Project log

Right!: I have too many projects on the go. As do you all no doubt.
So I've decided to list them all here, and progressively cross them out and link the galleries of the finished pieces. This is a desperate attempt to get on top of the plasticrack habit!!

as the entries get progressively barred they will become links to the finished piece or article :)

Painting projects:

Demo Ogres
DE Heamonculus
Cadwallon Grave digger
Demonette
DE corsair captain
DE Executioner
40K Chaos cultist
Teddy Fear
Painboy
Brother Deino
Wild rider
Road closed
Savage Orc boss
Brother of Light
Tapioca
Grimm Burlocksson
Dwarf miner duo
Bragg the Gutsman
Orc bust
Pacification diorama
Ork warboss and suite

Conversion projects:

Asian ogre
Mad Max Ogryn
40k Chaos champion quartet

Sculpture projects:

Mage troll
Femina Mechanica
Cpl. Bob
Rat Bust
Troll bust
Apocalyptica Futura
Victoria
Talhoffer
Assassin


Articles to be written:

Rainbow dust
Greenskin skin
Sculpting a mohawk
Freehand 101
planning a simple conversion
PA airbrush review
Scale 75 paints review
Andrea skin box set review

Monday, 25 November 2013

Workshop Update

Okay! It is time for some organising I feel, and this gives me the opportunity to show you what I will be working on in the next few weeks exclusively. One of my major problems, that I share with many hobbyists, is that I start more projects than I finish. So here is the plan: to only work on certain things until completion WITHOUT starting anything new OR taking up old projects in the vain attempt to finish them also.

So I will be exclusively working on the following six projects in this order:

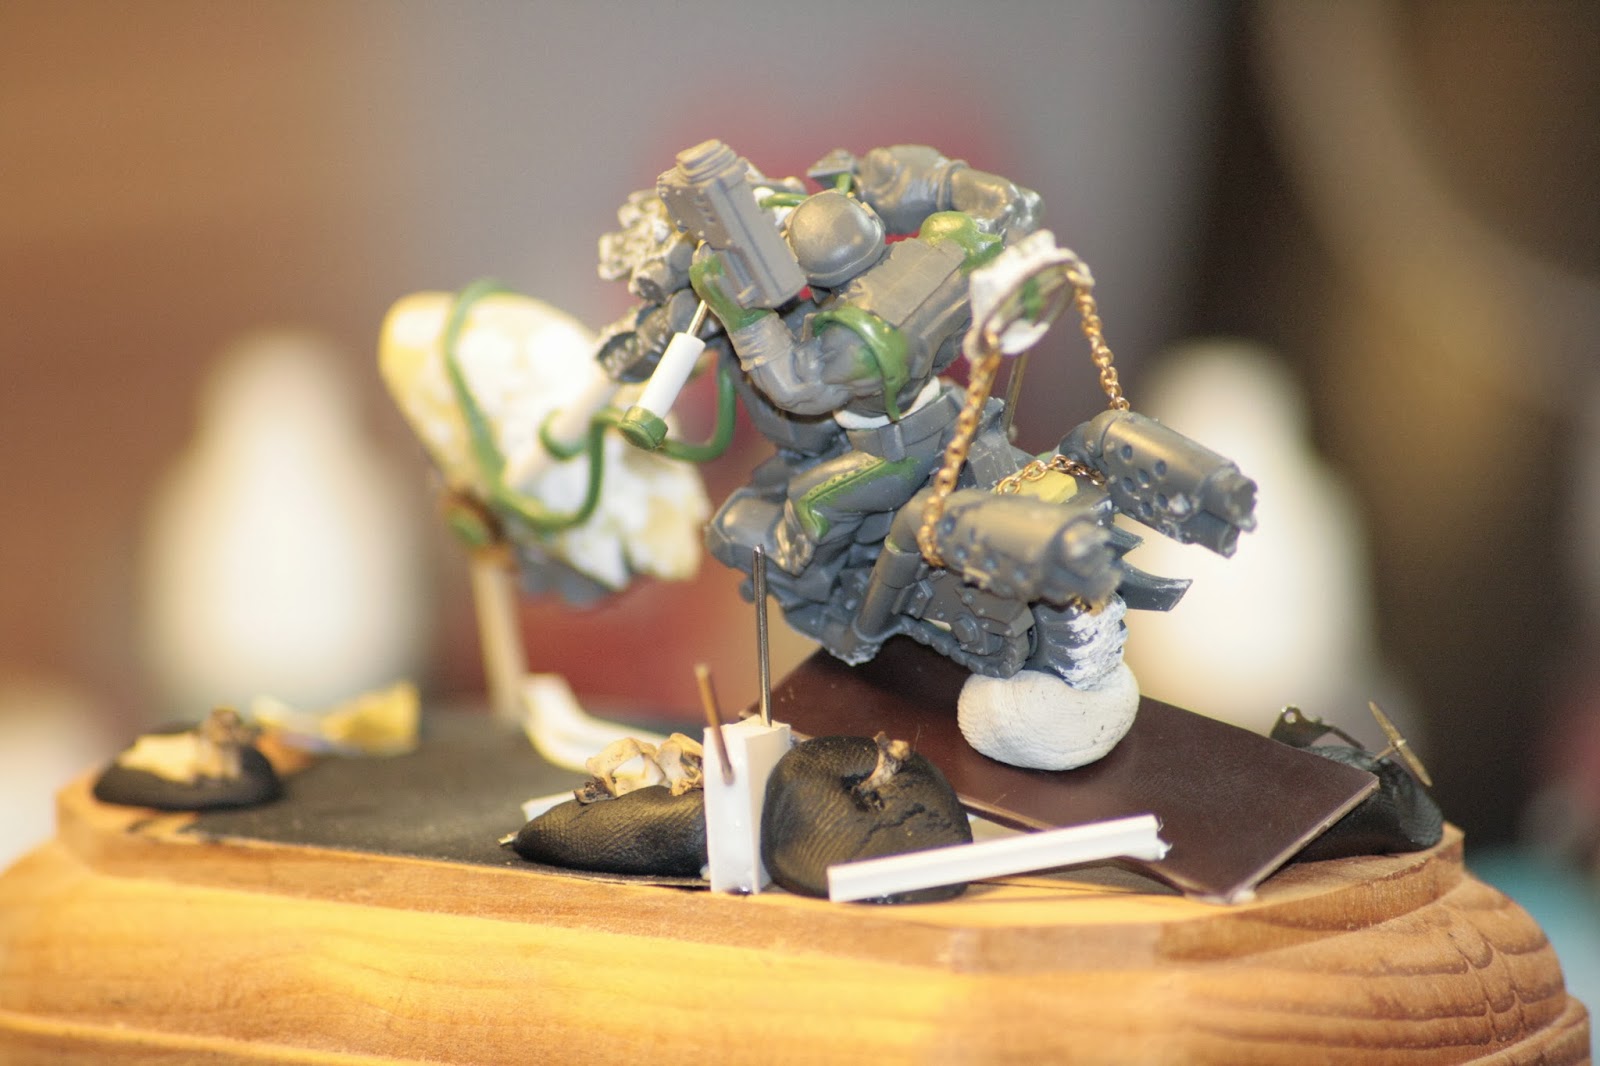
1) "Easy Rider" the ork biker

This piece has a deadline: the 7th of December 2013 for GW Bristols' painting competition on the theme "mounted model".
Here is the current state of play:


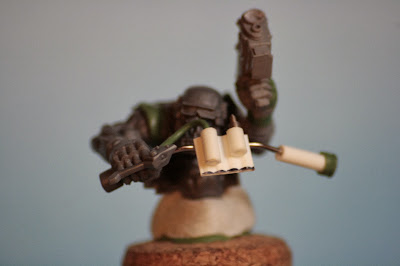
Still some sculpting work to be done on the handlebars and around his left hand to finish his glove.

A few final touches underneath the arms to create the rugged edges of the torn leather cut, thus hiding the simple GW "glue on sod this" finish.

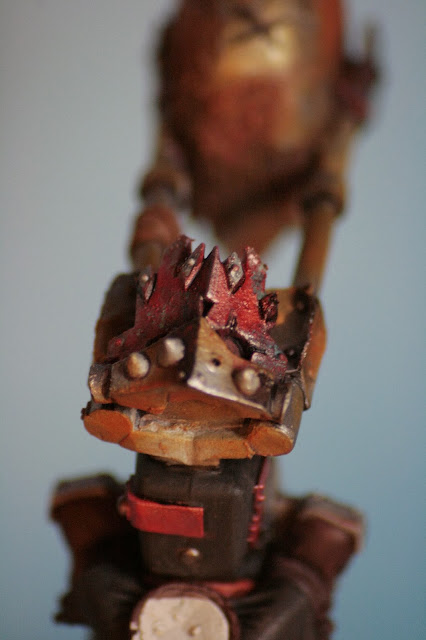
"Screaming Bell" is an awesome colour in fact! Also you can see the start of the powdered pigment work used to recreate rust and dust effects.

The use of deep blue to shade the Screaming Bell, also you can see the first use of GWs' new technical "Nihilack Oxide". (More on this technical range in an upcoming product review)

Work on the base has finally started also. As usual I use the same shades on the base as on the model.

An overall view showing the extensive pigment work.

And the same from the other side! 
Still quite a bit to be done but I am beginning to see the general finished effect coming into view...

2) Nurgle WFB champion

This is one old abandoned project I am glad I forgot about until now. I will be able to use my increased understanding of contrast to better enhance this guy. 

Here I have already started re-working the contrast on the stell NMM parts.

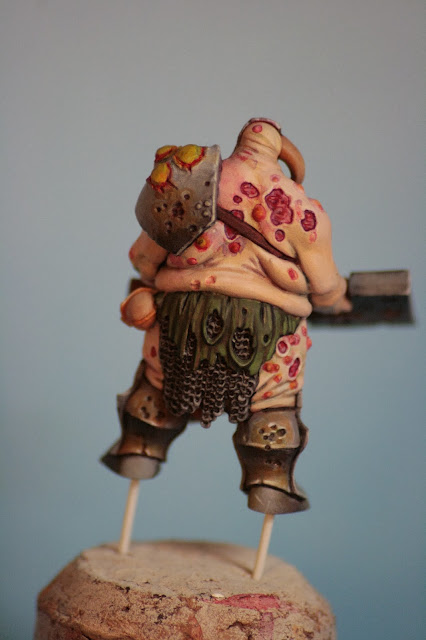
Another view showing the contrast work. Also I am enjoying playing with enhancing glazes to give a greater richness and depth to the fleshy parts of the sculpt.


3) Nurgle 40K Champion

Possibly the OLDEST project ever in my experience! I originally started this conversion at least eight years ago, and feeling dissatisfied with it left it to one side. I now return to it with a greater knowledge of scultpure and converting as a whole and look forward to revisiting and finishing my vision of this glorious old-school sculpt. I particularly love that power gauntlet. Seriously WHY did they ever change that element of the nurgle style?

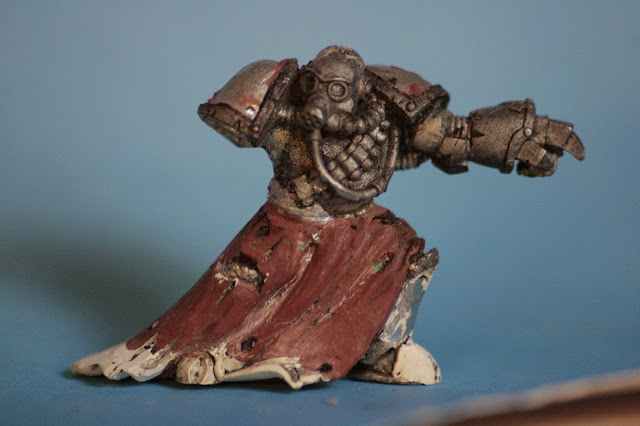
I have already removed certain details I had sculpted years ago in preparation for the changes...
Seriously look at the elegant simplicity and aesthetically pleasing form of that gauntlet!!

There was something on his back... My hobby knife expressed my feelings towards the result achieved at the time...

4) Shroom Shaman

You have all grown to know this guy but here he is with his first few coats of paint 


5) finally for fun: the Scottish Goblin


now this is because you always need something stupid and simple to take your mind off the complicated projects! This one will end up with the tartan of my own clan and maybe, if I can be bothered really, a Squeep (which is a mix of a Squig and a sheep)


There we go that is the plan for the next few weeks! Upcoming articles will include:

- a product review of GWs' latest technical paints
- a "how-to-do: goblin skin"
- the finished "Easy-rider" and an article on the use of dry pigments in miniature painting and basing

Hope this program grabs your interest!
Stay tuned and keep on painting happily!

Friday, 22 November 2013

Easy Rider: in the garage...

A sneak preview of the upcoming piece for GW-Bristol's december painting competition!

More on this guy once he's finished, stay tuned folks!!


Thursday, 24 October 2013

Technology at its' worst (also administrations are out to get me...)

Well many apologies for my recent silence. A combination of emergency travels and a computer taking on a life of its' own have combined forces, over the past few days, to ban me from communicating.
However all is returning to normal, thank you googleAdblocker!! So here is a brief article just to get you back up to speed with the unfortunatley small progress over the past few days.

So what was has happened? Well let's start with what I haven't worked on: Shadowblade. A mad dash over the week end took me away from my paint station for five days so he hasn't come on at all... Not to worry he is only due for the 2nd of november and I'm only going to work on him from now on until he is done (fine words but let's see if that really happens...).

These doubts come from the fact that:
a) My toking little junkie shaman is coming on and I'm really impatient to finish the sculpting work so I can get on to the painting.
b) I ransacked a hobby store in my home town and came back with some amazing miniatures that are begging for my attention.
and finally
c) At my local hobby store yesterday the idea emerged to create some Banksy style decorated Ork Killer Kans, and this led on to the creation of the "Grotsy" character and his graffitiying a wrecked tank... Fortunately I have none of the miniatures as yet for this idea but it will have to happen... Or do I? Damn!! I knew I had bought some Killer Kans yesterday... Oh well... Let us see what happens. After all one of the beauties of keeping this a hobby is that I am free to do exactly what I want, when I want and how I want (spoilt child syndrome? Nope: I don't believe it should be this way, but it is.)

Well here are a few pictures of the current progress. Very little details to add for the moment as I am well behind my schedules for practically everything at the moment so I must quickly return to work...

The desktop photo that should have been updated saturday... Now you can see a small "WIP" photo station! Oh: and it's a glorified mess...

I love playing with angles of site and framing in my scenes. Here the construction of a very simple barred window on the base of my "Cultist raid"

The masking of the base and preliminary texture of the walls

A close-up of this preliminary texture. I might not add to it actually as I quite like it as it is. I will see when a base coat is applied how I feel about it...

The Tube Tool has arrived and it is oh so wonderfully simple and effective!

Seriously: a brilliant tool!

Our Hookah is connected! This is going to be epic to paint!!

Right! Now to return to Shadowblade and catch up on time lost...

Also stay posted as in the coming days I feel a small competition coming on with a little prize for the winner!
https://www.facebook.com/pages/Tiny-People-Studio/168191060042372

Monday, 14 October 2013

Shadowblade on contract: Day 1

In a previous post dealing with this guy I rather rashly took on the resolution to work to a schedule in the hope that the discipline might help me better organise my painting in general.

Well I'm happy to say that I have not bottled out and as you may recall: Day 1 was to see the head finished. So here it is as proof!


The "over the soulder" pose: a classic from all good pin-ups throughout the ages!

The final touches will be made when I reach the finishing stage and the head is assembled to the rest of the figurine.

Tomorrow should be the legs, so as a reminder here is what I will be starting from:


See you tomorrow!

Restless nights...

We've all had them: nights where sleep will not come. Why is this? Stress because of upcoming exams, relationship issues, maybe it's just the sound of the neighbour introducing his new girlfriend to the ceiling in a very loud manner... Or maybe it is because you really just can't put your brushes down as you are "on a roll"!
Whatever the reason, it is much better to use this time than just hope for sleep! So amid essay writing ( because yes I have a real life outside of wee men and monsters ) I took up another little project, that then became two...

I also dug out a picture of a past little paintjob that I'm really pleased about and decided to write an article on this guy as well...

So last night was illuminated by finding this on my desk:

image taken from GW site

So what to do with these guys? I don't play Chaos, in fact I don't play at all I just love the modelling aspects of the Hobby. Well the guy that really grabbed my eye, out of the five models in this kit, was the one with the gas mask and club. He's got a slightly dynamic pose, a bit of an evil "emptiness" due to the lack of facial features, just a few extra details: basically he has fun written all over him. I therefore chose to isolate him and paint him as a single character, with his own little base and everything!

And here he is before priming! 
I couldn't resist it: usually I always modify a bought miniature in some way or another ( with the recent exception of my "Shadowblade" ) because I feel that in this way I somehow make an industrially mass produced model my own unique model.

So what happened to this guy? Well the club he was originally carrying was transformed into a cartoon-style oversized meat cleaver. To do this I scraped off the little barbs that were part of the original. I then shortened the club to adapt it to the blade which I cut and sanded off from a sheet of Milliput (in this instance I used the White Superfine Milliput). Finally, using some GreenStuff I shaped the two strips creating the attachments between blade and staff/handle.


The base was built upon a small wooden round base that I made a stock of for just such miniatures: ones that don't warrant a full on custom expensive base, but that you want to endow with something better than those horrible plastic gaming bases (sorry gamers: I know that the lack of size to embellish your HQ choices is sometimes a pain to you also). Two strips cut from a plastic "I" profile gave me room to fit in pipes and serve as a level surface to glue the anti-slip flooring. I really love pipes on post-apocalyptic bases, I don't know why but I do. I then filled in around the pipes using Milliput Standard Yellow/Grey putty.

The "I" profiles and the pipes. The larger pipe is from a specifically made plastic profile, the smaller pipe is the protective cap of a paintbrush.


The Milliput fill-in.
As you can see I created some simple varying levels by simply pushing and flattening the putty using a toothpick. Later, when flocking is added this wil create a more interesting surface than flat putty.


I then glued a few small slates around the bottom of the "I" profiles with PVA glue and finally using Superglue (please be careful using this stuff!) I fixed some simple dirt dust on the various desired areas.


The slates

The dirt dust (the dark brown stuff) is clearly visible. This photo also shows the circulation level on which the cultist will finally stand.

The final circulation surface was cut out of a sheet of textured plastic, the particular texture chosen is that of an anti-slip metal floor plate. As a final touch some screwed up papers and drink tins were modelled out of lead paper. In a future article I will show you the wonders of lead paper and its' uses for your bases and conversions!

Long story short here is the state of our cultist after a sleepless night:


Still a lot of work to be done, however I intend this to be a quick project so stay tuned for the final pictures of this guy!

BUT WAIT!!!!!
What happened to the other four???

A very good question! (Multiple exclamation marks are apparentely a sure sign of insanity. What do you think??!!)

Well my folly made me turn four of the lowliest most useless pieces into a decent sized project (by my standards anyway). The various poses of these guys led me to see them rampaging through alleys ransacking a town fallen to the dark gods of Chaos.
So out comes the box of random bases to hunt down something that could be used to create a small crossroads. I'll leave you simply with some pictures of this project as I intend to write a full step-by-step on creating a small scene using this piece as the walkthrough example.


'Til next time!!!!
(more multiple exclamation marks... the madness is set in I fear...)


Sunday, 13 October 2013

Mushrooms! Mushrooms everywhere!!!!

Earlier today I shared with you a few pictures of my upcoming toking junkie of a Goblin Shaman. After a few hours of work, hopping between three different projects today, here he is nearly ready for painting!


In the end I have elected to leave the mushroom head on and paint the project as one whole single piece. All that remains to be done before priming is to detail the underside an topside of the mushroom, and flock the base. But I will not be able to advance on this guy before the awaited delivery of my PK-Pro order... 


Don't do drugs! But paint them...


Mood music!!


My first love in miniatures has always been the greenskins of all denomination. Recently I realised that I have not painted one in AGES! So a quick trip down to my local hobby store and I came back with this guy:

Yes this is GWs' picture (for comparisons' sake)

I love creating little scenes, so this guy is basically going to be a hookah dragging junkie. So here goes with some sneak WIP pics' of this project:

The Shamans' staff was shortened to later be transformed into an american-indian style pipe. You can also see the beginning of the hookah pipe to the left. In the background you can see the armature for the massive mushroom that he will be sitting under.

A better view of the mushroom armature.


I plan to paint this guy as one whole piece on his base. I might however leave the mushroom head off until the end to make access to certain areas easier.

a close-up view of the advancing Hookah pipe.


Also I am looking forward to the delivery of a wonderful tool by PK-Pro: the Tube Tool!! This will come in handy to make the various tubular pipes coming out of the Hookah, and will also be a wonderful addition to my sculpting tool box.

More on this guy coming soon to a computer in front of YOU!

https://www.facebook.com/pages/Tiny-People-Studio/168191060042372

Saturday, 12 October 2013

Fifty shades of Grey: the advance of NMM

Shadowblade progresses slowly. I have decided to try and function with a "to-do-list".
So here is the curent state of our evil heartless assassin:


The plan is to finish him by this time next week along this program:

Day 1: Head
Day 2: Legs
Day 3 Torso
Day 4: Daggers
Day 5: Arms and Hands
Day 6: Cloak
Day 7: final details (I have not yet decided wether or not I will add a freehand design to the cloak or not...)

Maybe this plan will actually motivate me to reorganize my way of working in general...

Stay tuned for the day-to-day update and the step-by-step tutorial that will be published after the completion of this piece!


Thursday, 10 October 2013

The Apocalypse Preacher (vol. I)


Ongoing project (WIP)


to get you in the mood...

This guy is a loooooooooooooooooooooong ongoing project. I've been coming back and doing bits on him for the past year and a half. Unfortunately I am a painter who starts more projects than he finishes, maybe this blog will help me discipline myself against this shortcoming...

Anyhow here is the current state of play!


The base is built up around and under a resin base by Fenryll, a few loose slates from Citadel / Games Workshop were added to blend the assemblages into each other and provide a level surface on which the Preacher will stand defiantly!

As you can see: defiant! Worthy of some of Irelands turn of the century "fire and brimstone" preachers!


I gave him a longer and more unkempt beard using GreenStuff; his original staff was replaced by drilling through his clenched fist and inserting a 1mm thick piano wire. The Imperial "I" was liberated from the hand oh a Sister of Battle; the various parchment strands were cut out of lead paper and finally the seals were quickly modelled out of GreenStuff.

At the rate he's going I may just have finished him by next summer... More news on this guy to come no doubt! 

However I must now return to work on my upcoming competition piece...